 EN
EN

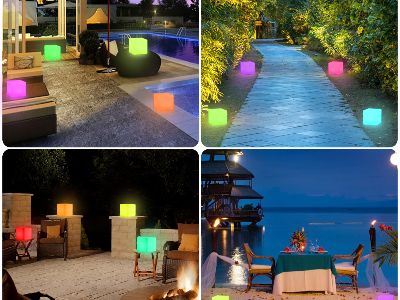
The Instagram & Pinterest era is here, and pictures matter. If you're an interior designer, presenting a project; a restaurateur, marketing a new terrace; or an event planner, creating a portfolio, you know how crucial it is for the way that you take pictures of LED furniture to make a difference in your marketing. Glowing sofas, light up planters (with reflective surfaces), and colors that change and brighten over the course of a shoot are photogenic by themselves, but also create special challenges for the camera: Dynamic colors, varying intensity and reflectivity can confuse the auto-settings and spoil a shot. We've been producing CE, RoHS, FCC certified LED furniture for 18 years at Shenzhen Coolqing Technology Co., Ltd. and we have some tips on how to get it looking its best for the camera. Below are 4 key tips to help you take “snapshots” of rooms with our products to sell them beautifully.
1. Master the Exposure Triangle for Glowing Highlights
The light that the LED furniture emits is not the light that your camera observes, meaning that your camera can be fooled by the light and you will end up with blown-out highlights or underexposed surroundings. The secret is to shoot in manual and know the exposure triangle – aperture, shutter speed, and ISO. If you have LED seating or bars in the space, use a medium aperture (f/5.6 to f/8) so that the lighted item and the background are fairly crisp. For static images, use an exposure time of approximately 1/60th of a second or lower when using a tripod. Then, set your ISO to the lowest setting (100-400) to reduce noise. The pro trick is to focus on the brightest LED element and then to use a fill flash or bounce card to illuminate the rest of the scene. This ensures the furniture doesn't appear as a floating blob of light, while still retaining its striking appearance. The LED Battery Series and Solar Lights Series are also adjustable in brightness, allowing you to turn the lights down a bit during shoots without sacrificing professional quality, no matter how bright they are.
2. Choose the Right White Balance to Preserve True Colors
Inaccurate color is one of the biggest frustrations of taking photos of LED furniture. LEDs can give a cool or warm color tint, and your camera's auto white balance (AWB) will attempt to 'correct' the shot which often gives a lifeless, muddy image. This can be avoided by using a custom white balance with a gray card under the real lighting of the shoot. Consider using the Kelvin adjustments in a space with a combination of light sources, such as natural light and LED furniture. Start around 5000K for daylight-balanced LEDs and tweak from there. If you are using one of our Ambient Lights Series or Decor Lights Series and are looking for colors to change, we suggest you shoot in RAW format because most of these lights have RGB color changing modes. This allows the utmost post-production flexibility to adjust the white balance without compromising the image quality of the shot. Also, stay away from fluorescent or tungsten presets because they will affect the LED's intended colors. Note, the aim is to present your clients with just what they will see in person, correct, colorful, and true to our certifications.
3. Light the Space, Not Just the Furniture
LED furniture is a star, but shouldn't be the only source of illumination. The common mistake is to shoot in the dark, making the image flat and without spatial context. Instead, use multiple lighting levels. To illuminate the architecture, textures, and other design elements, use soft, diffused ambient light—such as overhead lights, string lights, or window lights. Then, let your LED pieces serve as accent or mood lighting. Photograph our LED Flower Pots Series on a pathway, while softly illuminating a tree in the background, or shoot our LED Ice Buckets Series on a bar-top in front of some subtle uplighting behind the bar. This adds depth and dimension. For outdoor photos, plan to take them during the 20-30 minutes shortly after sunset, when the sky is an incredible navy blue. Our Solar Lights Series and LED Furniture Series stand out in dramatic contrast to this natural backdrop, resulting in high-contrast, editorial and sellable images. Also, most of our products are usually in stock so you can make test shoots with several set-ups before you go for your final campaign.
4. Composition: Show Context and Detail
The story of the image is important when it comes to great product photos. With LED furniture, that means making sure you show wide shots to get the context and close-up detail shots. Begin with a wide shot (16-35mm lens), showing the whole space, the glow of the sofa holding the lounge or a string of lit tables helping you to flow through the restaurant terrace. This can help prospective customers to gain a sense of how your goods will perform in actual settings. Once you have found something you like, you can then come in for close-ups: macro close-ups of the LED diffuser pattern on our Furniture Series, close-ups of the glow that escapes from a planter in our LED Flower Pots Series, or the shimmering ice in our LED Ice Buckets Series. The close ups emphasize build quality, texture of materials, and the quality of our OEM/ODM custom work. Also, add some human aspects as well (a hand reaching for a beverage, a couple talking on a lit-up bench, and more) for scale and emotion. Our remote controls let you adjust colors and brightness on the spot, allowing you to create the perfect ambiance for every shot without moving furniture around.
Conclusion
You don't need to be afraid of taking pictures of LED furniture. If you take the right shots with the correct exposure, white balance, layered lighting and careful composition, then images will do justice to the innovation and quality of Shenzhen Coolqing Technology's products. With 18 years of experience, we have everything on hand and can customize everything to suit your needs so you'll have the right pieces for your shoot, plus we have technical support there to help you present them in the best light. These tips will help your LED furniture get noticed, whether you're updating your portfolio or opening a new venue, or working on marketing materials. Looking to illuminate your next shoot? Let's talk.